ZX Slideshow

ZX Slideshow v3
FREE
Welcome to the best FREE Zen Cart slideshow module! This home page slider module allows you to have a user-friendly slideshow on your main page without writting code, adding image paths or messing around any other code - everything is controlled from the admin panel.
We DO offer professional installation service for the module, although you're most welcome to install it yourself. Installation is simple, although some code understanding is required.
FREE DOWNLOAD PRO install service - $20It is my pleasure to present you with a module I've built for Zen Cart and have released it in the official Plugins section to be available for free download. The module was built with intention to help store owners add images to their home page slideshow without writting code or manually uploading images via FTP.
NOTE: some CSS tweaks might be required after installing the module - please understand that every store is unique it's almost impossible to create this kind of module that will work out of the box without any tweaks for any website using any template.
IMPORTANT: this module has a support thread in the official Forum. If you have ANY problems installing or using the module, please check the Forum: support for v3 starts on page 73. Most questions have been answered - it is very likely that your question will be a duplicate...
Based on swiper.js and fully responsive
If you haven't heard about Nivo Slider, I will simply copy/paste the introductory text from it's official site: Swiper is the most popular mobile-friendly slider library on the web. Built with a focus on performance, flexibility, and native-like touch interactions, it powers millions of sliders across websites, apps, and digital products.
Built with SEO in mind
Search engines will not see the text that is part of your image, but separate layers of actual text are readable and can help your SEO. This plugin allows you to add animated layers of text on top of your images!
Controlled from the admin
Unlike other slideshow modules, you don't have to use FTP to add new images. You don't have to know or edit any code to make changes. All you need to do is go to the dedicated admin page and upload you images through the user-friendly interface, add and edit your text and buttons, choose from a list of animations and save it!
Responsive
Even if your template isn't responsive, you can still benefit from this feature. You don't need to know how to resize or crop your images to exact dimensions, just upload what you have and ZX Slideshow will automatically adapt the slider dimensions to your site and the images uploaded.
| Current Version: | 3.0 |
|---|---|
| jQuery version: | 3.6.1+ |
| Additional jQuery libraries | swiper.js (packed) |
| Database Affected: | YES - backup your database |
| Core Files Affected: | none |
| Template Files Affected: | 3 |
Installing - top
ZX Slideshow v3 is designed to work with Zen Cart 1.5.8+ (latest version at the time of release). It can be used with older versions after modifying the admin language files.
Before you proceed, make a backup of your database. Installation is done at your own risk.
If you're using an older version of ZX Slideshow based on Nivo Slider (v1 or v2), you MUST uninstall that version before installing this one.
Unzip the files from "files" directory to your computer. Connect to your server via FTP. Check your admin directory name and rename the one in this package accordingly. Next, check your template directory. You can do that by going into your Zen Cart admin section and go to Tools->Template Selection and check what it says under Template Directory. Of course, you're interested in the one you're currently using. Now, browse the files you just unzipped and go to includes/templates directory. Rename "YOUR_TEMPLATE" to the actual template name. Now, upload your files using your FTP client (I recommend using Filezilla) to the store root. Be careful, the store root directory on the server is where your store is installed, not necessarily domain root.
There are three files that might get overwritten:
- includes/templates/YOUR_TEMPLATE/css/index_home.css
- includes/templates/YOUR_TEMPLATE/templates/tpl_index_default.php
- includes/templates/YOUR_TEMPLATE/templates/tpl_index_categories.php
In case you have made any changes to those files, make sure you merge it carefully. Otherwise, you can simply overwrite.
After you have finished uploading the files, go to your Zen Cart admin section and the plugin will install automatically.
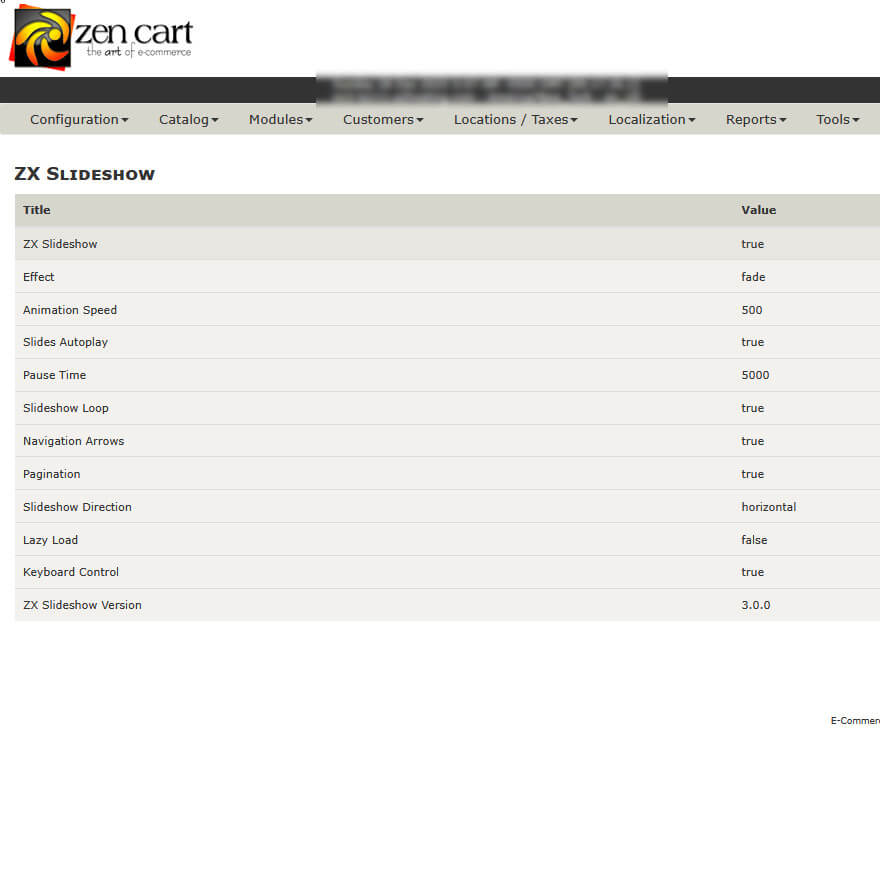
Configuration - top
To configure the module, go to Admin->Configuration->ZX Slideshow
The module is disabled by default, you should enable it if you want to use it.
All options are self-explanatory. For more information about each option, you can simply click on it.
Adding Slides - top
Go to Admin->Tools->ZX Slideshow and click New Slide.
Enter Slide title - this is only used in admin and is the only required field.
Lead In Text - first line of text on top.
Top Title - second line of text wrapped with h2 tags. Normally your punch line for the slide.
Subtitle - line that follows and describes the Top Title.
Text - allows you to add a paragraph with more detailed information for the slide. Keep in mind it's just a slide and you don't want to add too much information to it.
Button Text - text that shows on the button. Make sure you enter the Slide URL if you have a button!
Slide Group - set to 'home' if you want to show the slide on your homepage.
Image Alt Text - Add image alternative text for screen readers.
If you leave any of the above blank, it simply won't be used and won't be shown on the slide.
The Lead In, Top Title, Subtitle, Text and Button are all animated using animate.css. You can define the effect for each element individually. You can also define the animation speed (duration), delay, position, font size and color, and it's vertical position.
Default values are explained in the admin so you can always see it while adding or editing a slide.
Image - browse your computer and upload an image.
I recommend you resize your images to the same dimensions before uploading. This is not necessary since the module is responsive, but it looks better if it doesn't change dimensions with each image loading.
The slider is set to use the height of your images. The full height of the image will be displayed and then positioned in the center of the container. If the width is larger than the container, it will simply appear cropped.
Additional information - top
If you want to change the look of your slider, you can edit the includes/templates/YOUR_TEMPLATE/css/index_home.css file - that's just about everything you'll need to edit.
If you want to display the slider in the header instead of center area:
Step 1: open your includes/templates/YOUR_TEMPLATE/templates/tpl_index_default.php and REMOVE all code for ZX Slideshow.
Step 2: edit your includes/templates/YOUR_TEMPLATE/common/tpl_header.php and find the position where the slider should be located. This is usually at the end of the file.
Step 3: add the following code:
<!-- begin edit for ZX Slideshow -->
<?php if($this_is_home_page && ZX_SLIDESHOW_STATUS == 'true') { ?>
	<?php require($template->get_template_dir('zx_slideshow.php',DIR_WS_TEMPLATE, $current_page_base,'templates'). '/zx_slideshow.php'); ?>
<?php } ?>
<!-- end edit for ZX Slideshow -->
Common Issues - top
Please take extra care when selecting font color for any of the text to remain compliant with Accessibility Policies. Text displayed over an image may become hard or impossible to read because of the image colors. Make sure you check your slider's accessibility after publishing a slide and make any changes required.
Any issues or bugs you notice, please report it in the official Forum or on GitHub
Ideas for improvement are also most welcome!
Sources and Credits - top
External libraries used in this plugin:If you find this module useful, please consider donating via PayPal to ensure this module is supported and improved ($5 - $10 recommended).
Support - top
Please note that I don't provide support for this module via email for free. Any private support means there's no benefit for the community but only for the person asking the question(s). If you want free support, please post a question in the official thread and wait for the answer. Make sure you include a URL to your site!
AGAIN, make sure you include a LINK to your site when asking a question - all problems are usually very simple, but I can't go guessing what happened in YOUR case.
Most of the questions have already been answered in the official thread - try reading or searching for the answer before posting your question. Thank you.
If you want private support or installation help, you're welcome to contact me via email. I charge symbolic... :)
Stay up-to-date: you can always find the most recent version here. Of course, I will do my best to have the same version available in the official Plugins section.
Uninstall - top
Delete all plugin files from your server. If you made any changes to the 3 files mentioned in "Installing" section, manually remove the code for ZX Slideshow from those files.
Once all the files are removed, run the following SQL patch from admin->Tools->Install SQL Patches:
SET @ZXconfig=0;
SELECT @ZXconfig:=configuration_group_id
FROM configuration_group
WHERE configuration_group_title= 'ZX Slideshow'
LIMIT 1;
DELETE FROM configuration WHERE configuration_group_id = @ZXconfig;
DELETE FROM configuration_group WHERE configuration_group_id = @ZXconfig;

DELETE FROM admin_pages WHERE page_key = 'configZXSlideshow';
DELETE FROM admin_pages WHERE page_key = 'toolsZXSlideshow';
DROP TABLE zxslideshow;
